Showing posts with label dessert recipes. Show all posts

Key Lime Pie Cookie Cups

Key Lime Pie Cups
Summer always makes me think of key lime pie! 

I associate key lime pie with Florida vacations because I was on vacation in Destin, Florida the first time I ever eat key lime pie.  It has been one of my favorite desserts for many years since.

When I came across this recipe for key lime pie cookie cups, I knew I would have to try them myself.  They would make the perfect party food, appetizer or dessert.  Snack size treats are truly anytime treats!

Because they are made in a mini muffin pan, they would be the perfect size for a single serving dessert.  I always enjoy serving desserts that do not require cutting slices to serve, which allows me to get back to the dinner party faster.  Single serving sizes are also wonderfully self-serving.


Key Lime Pie Cookie Cups Recipe


The recipe for these fabulous Key Lime Pie Cookie Cups is published on Shaken Together.  Keri introduced me to the Pillsbury Key Lime Cookie mix in her article.  Using that mix, she shares how she created these beautiful and tasty treats.  She even shares photos showing how she molds the cups, which makes it very easy to emulate.  

Once the cookie cups are baked, she simply tops them with her key lime frosting using a star tip.


I have no doubt these Key Lime Pie Cookie Cups will end up being a favorite in your home and for your parties too.  You may have to hide a few just so you get some yourself!

If the Pillsbury cookie mix is not readily available, you could use the Key Lime Cookie Recipe published on AllRecipes.com and the Key Lime Buttercream Frosting recipe on MyRecipes.com.


Recipe & Image Credit: 

Recipe by Keri on ShakenTogetherLife.com  - Key Lime Pie Cookie Cups

Marshmallow Jello Pinwheels Recipe

https://i2.wp.com/simpleethrifty.com/wp-content/uploads/2015/05/Marshmallow-Jello-Pinwheels1.png?w=800
If you want a really fun and fast treat to make, then I have the perfect suggestion for you here today on Fun Food! 

These Marshmallow Jello Pinwheels are great "pop in your mouth" appetizers, party treats, after school treats, or even lunchbox treats. 

Since jello does have to be refrigerated, you would need a Lunch Ice Pack in the lunchbox, but it would certainly be worth that little extra effort.  Your kids would love it and no doubt, their lunch pals would be requesting that you send extras tomorrow.  My children always loved being able to share treats with their friends during lunch at school.  I kept those freezer cubes in the freezer at all times just for these types of special lunch treat.   All I had to do was reach in the freezer and grab one to stick it in their lunchboxes. 


Marshmallow Jello Pinwheels Recipe


The Marshmallow Jello Recipe is super easy and takes on a few minutes to whip together.  They are made with the combination of jello and marshmallow as the recipe name indicates.  What really grabbed my attention was the way they are cut into little roll-up treats.  Heidi from Simplee Thrifty, tells us exactly how to easily cut the solidified jello treat into a delicious roll-up finger food.  Her method is "simply thrifty" and nifty! 

Check out her recipe and cutting tips to make your own Marshmallow Jello Pinwheels.  The kids will love you for it!


https://simpleethrifty.com/marshmallow-jello-pinwheels/


Recommended Lunchbox Cooler Packs


When my children were in elementary school, I used these blue ice packs often, almost daily, to keep the food in their lunchboxes cool.  They really do work!  Just remind your children to leave them in their lunchboxes and not throw them away with their trash.   Once our daughter switched over to lunch sacks instead of a lunchbox, I inserted the little ice pack in a homemade fabric sleeve so she could throw away the sack, but keep the blue ice in her backpack to bring home.  However, a baggie for the blue ice pack would work just fine too.


Recipe & Image Credit: 

 Marshmallow Jello Pinwheels by Heidi at Simplee Thrifty

Peanut Butter Chocolate Banana Popsicle Recipe

https://glitternspice.com/wp-content/uploads/2015/07/chunky-monkey-popsicles-5.png
School has started and everyday our children come home hot and tired.  Day after day we watch our kids make a bee line for the refrigerator and freezer searching for something to cool them down quickly.  I have found the perfect cold afternoon treat!

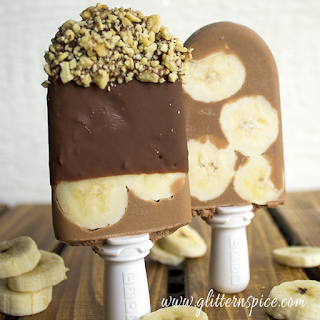
These Chunky Monkey popsicles can be made in advance and left in the freezer for those precious hands to easily grab.  The kids will love them and so will you because they are so fast & easy to make.


How to Make Chunky Monkey Popsicles 


I call them Peanut Butter Chocolate Banana Popsicles because they are made with peanut butter,  chocolate and bananas, but the creator of these popsicles dubbed them Chunky Monkey Popsicles.  Perhaps, Chunky Monkey is an easier title.  Regardless of the title, they are simply delicious.

Corrinna has featured the recipe for her Chunky Monkey Popsicles on her Glitter 'N' Spice website, which happens to be one of my own favorite sites to visit.  She has given us very easy instructions to follow and also featured the needed Pop Maker to make the popsicles.  Since it only takes about 10 minutes for the popsicles to freeze, you could even make them right before the children get home so they will be ready and waiting.

Corrinna has also included a Magic Shell Chocolate Coating recipe in case you wish to dip your pops in chocolate and maybe even nuts.


Come to think of it, you just might want to make them long before the kids get home from school.  But please, do be kind enough to leave one for each child.


Recipe & Image Credit: 

Chunky Monkey Popsicle Recipe  by Corrinna, author of Glitter 'N" Spice

Luau Cupcakes Recipe

http://www.createdby-diane.com/2010/07/luau-cupcakes.html
Summer break is drawing to a close even though we still have a few months of hot weather ahead.  Many of the children are already back in school, but that doesn't mean we can't have a final summer party before they really have to get back down to work, or perhaps a back to school party.  What better way to end the summer break than with a Luau filled will fun, friends and special treats.   

Sometimes the simplest treats to create, make the biggest impact at a party.   That would be the case with these fabulous Luau Cupcakes Created by Diane.   These cupcakes are so easy to make, yet they are perfect for a Luau.  This toasted coconut covered cupcake topped with pineapples and cherries capture the essence of Hawaii in a wonderfully tasty treat. 


The Luau Cupcakes Recipe

You may think you can replicate this cupcake by simply looking at the picture, but I assure you, Diane does share a few tricks to make these cupcakes more than a simple cupcake.  Be sure to take note of the cake mix substitutions and her advice about the toasted coconut.  You can find the complete recipe and instructions for Diane's Luau cupcakes on her site Created by Diane.


How to Toast Coconut

Toasting coconut is easy, but does require a bit of patience to achieve that lovely brown toasted shade without burning the coconut.  It takes about 10 minutes to toast coconut in a skillet and you will need to constantly stir it.  Keep it moving to keep it from burning.  There is no need to add any oil or liquid to the skillet.  Only the coconut!

Here is a video that I found on Youtube that shows you the "real time" process for toasting coconut.


Recipe & Image Credit: 

Luau Cupcakes Recipe  by Diane, author of Created by Diane

Strawberry and Blueberry Cheesecake Icebox Cake

Strawberry and Blueberry Cheesecake Icebox Cake
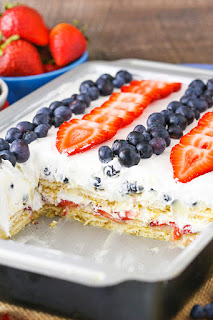
The fourth of July will be here before we know it!  We all want to celebrate the red, white and blue and what better way to do that than with strawberries and blueberries.

This delicious Strawberry and Blueberry Cheesecake Icebox Cake Recipe has been calling my name since I first discovered it on the Life, Love and Sugar website.  This no-bake recipe calls for a few simple ingredients layered to make this beautiful presentation.

You can't miss with this awesome icebox cake!

All of the individual ingredients are tasty alone, which makes assembling it a bit of a challenge because you will be temped to eat every little morsel along the way.


The Strawberry and Blueberry Cheesecake Icebox Cake Recipe

You can find the recipe for this fabulous Strawberry and Blueberry Cheesecake Icebox Cake by simply visiting Life, Love & Sugar.  I have no doubt as soon as you see how easy it is to create this lovely "patriotic" dessert, you will be jumping in the car to run get the necessary ingredients.  Just one little warning, you may want to make it a day ahead because it needs to be refrigerated for at least 4 hours.

Strawberry and Blueberry Cheesecake Icebox Cake

For my readers that live in the United States, I would like to wish you a safe and happy Independence Day this 4th of July!


A Little Update:  My precious mother read this article a few weeks ago and made this fabulous cake for our family for the 4th of July.  I just have to say, mine could never compete with hers.  It seems she always includes that special ingredient in anything she makes, the love for her family.  Moms are simply awesome right?    Thank you Mom! 

PS:  Our son has eaten the leftovers for breakfast for the last 2 days.  Sorry to say, it is all gone now.


Recipe & Image Credit:  Strawberry and Blueberry Cheesecake Icebox Cake Recipe  by Life, Love & Sugar

Orange Sherbet Recipe


Orange Sherbet Recipe
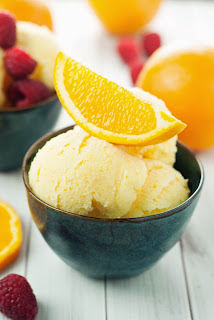
Orange Sherbet is one of my all time favorite summer treats.  Well, actually I eat it year round, but it is especially delicious on a hot summer day, or to sooth a sore throat when hit with allergies.

Finding an Orange Sherbet Recipe was like receiving a gift at just the right time for me.  I recently had a bad encounter with tainted orange sherbet from the grocery store.  Unbeknownst to me, the brand I had purchased was believed to be contaminated with Listeria monocytogenes.   The product had been recalled in several states, but not in my state, so it was still on the shelves being sold.  It has since been recalled here as well, but not before my purchase and subsequent reaction.  

Since I actually prefer most things homemade anyway, I have to say there was definitely a silver lining to that black cloud for me.  I had never even considered making my own orange sherbet before.


Orange Sherbet Recipe


With a few really simple ingredients, in addition to real oranges, now I can make my own orange sherbet and have no fear associated with my favorite treat.

I selected to try the Orange Sherbet Recipe from A Simple Pantry first, but there are additional orange sherbet recipes listed below that you may prefer due to your own dietary preferences.  In addition to the oranges, this recipe calls for sugar, vanilla extract, lemon zest, kosher salt and heavy whipping cream and can be made with or without an ice maker.

Be sure to checkout the comments on the original recipe above for recommendations by readers who desired a stronger orange taste.


Additional Orange Sherbet Recipes


Orange Sherbet Recipe by Alton Brown ~ Uses whole milk and a touch of lemon juice.  Ice Cream Maker Required

Orange Sherbet Recipe from A Cozy Kitchen ~ Uses whole milk and lemon juice.  Ice Cream Maker Not Required

Orange Sherbet Recipe from Beverly at Allrecipes.com ~ Uses orange juice, milk and evaporated milk.  Ice Cream Maker Not Required.  Electric Mixer Required.

Orange Sherbet Recipe from Cooks.com ~ Uses Orange soda pop and Eagle Brand condensed milk.  Ice Cream Maker Required

Orange Sherbet Recipe by Kittencal at Food.com ~ Uses Orange Juice Concentrate and half & half cream.  Ice Cream Maker Not Required.  Electric Mixer Required


How to "Make" Orange Zest for the Recipe


A Bit of Extra Fun with Other Sherbet Flavor Recipes


Lime Sherbet Recipe from MyRecipes.com

Rainbow Sherbet Recipe Step by Step Video by Byron Talbott


If You Need an Ice Cream Maker

  Many of us remember the big ice cream makers of our youth that required constant attention, adding ice and salt until the mixer slowed down and we checked to see if the ice cream was frozen enough.  Our family actually set the ice cream maker on the concrete outside and took turns overseeing the process.

However, today there is a much improved ice cream maker available.  No ice or salt required to use this baby!   Plus, it can sit on the kitchen counter without making a big mess.


Recipe & Image Credit:  Orange Sherbet Recipe  by A Simple Pantry

“As an Amazon Associate I earn from purchases.” Disclosure Statement

X